
Windows Troubleshooting
Windows Permissions
We need permission to record voices and preferences on the user’s hard drive. Some administrators have locked down the computers so that we don’t have permission to write to the hard drive. They will have to grant our programs permission to run. If they know enough to lock down the computer, they should know enough to give users permission to write to their temporary directory and their programs directory. If you do not have an IT department and you are the only user of the computer, you are probably the administrator and should have no permissions problems.
Display is truncated on Windows 7
Windows 7 allows you to change the display scaling using the control panel. If display scaling is set to 150% in Control Panel -> Appearances and Personalization -> Display -> Make text or other items larger or smaller the screen may appear truncated and the text will be badly pixellated, particularly at screen resolutions of 768 pixels high or below (e.g. 1366x768, 1024x768, 800x600, 640x480).
If this setting is 150%, please try running our software with display scaling set at 125% or 100% and that will fix the grainy/truncated text.
Videos Don’t Play
Some of our CDs use videos in some of the games e.g. Train Time, Phonemic Awarenes, Basic Words for Children. Newer versions of Windows do not include QuickTime so you need to download it from the Apple website to play the videos.
Videos Are Choppy
The videos use QuickTime and over the years they have changed the playback engine. The result is that the sounds and movements are not synchronized and the video is choppy. Most of the playback issues can be fixed by replacing the video folder with updated folder. Download this folder and replace the Video folder with this new one. The video folder is located at Computer > Local Disk(C:) > Program Files(x86) > LocuTour Multimedia > Literacy - Phonemic Awareness > LMovies > VMovies > Video. The computer will give you several options for replacing. Make sure you select the one that does not keep the original files. It might be easier to delete Video folder first.
The screen is really tiny.
Our older software was designed for monitors that were 640x480 and 15". We rewrote the software so that the text scales nicely but some of the pictures don’t scale well to very large monitors. For these older titles, e.g. Articulation I and Attention and Memory I, we did not set the automatic scaling to fill up the screen. If you want them to fill up the screen, simply use the += key to make them bigger. (The _- will make them smaller.) Alternatively, you could change the monitor to 640x480.
Sound Recording
Almost all of our support calls for Windows involve sound recording issues. In most cases, the microphone was not plugged in to the correct port (it needs to be in the microphone port—not the line-in port), there was no microphone attached to the computer, or the microphone sound volume was set to mute. Sometimes it is just a misunderstanding of how the recording buttons work.
Using the Record Buttons
Many of our titles use buttons that behave the same way as buttons on a tape recorder. Click on the round red button and then release it. That starts the recording and the rectangle turns from gray to red. Say your sound. Then click on the red rectangle to stop the recording. The arrow turns green and you can play back your recording. You can play back your recording as many times as you want. When you go to the next page it is erased. You can record over the existing recording by repeating the process.


Microphone settings on Windows 7
To check the input level of the microphone, right click the speaker icon, located in the task bar at the bottom right corner of the screen. Choose Recording Devices. Double-click on the correct microphone. Volume will be in the Levels tab. Microphone boost may be there or in the Custom tab, make sure it’s checked if the level is at 100 and recording is still too quiet, or unchecked if recording is too loud and distorted. Make sure the checkbox in the Listen tab is unchecked if you’re hearing microphone feedback.
Microphone settings on Windows XP
On most versions of Windows XP you can double-click the little (yellow/grey) speaker icon, located in your task bar at the bottom-right corner of the screen, to open the recording control panel. Otherwise, you can find it from Start -> Settings -> Control Panels -> Sounds and Multimedia. Make sure that the microphone level is set fairly high and the microphone is not muted.
You may first need to change from playback volume to recording volume by opening the Options menu and selecting Properties, then making sure “Recording” is selected in the “Adjust volume for” section and clicking OK. Then make sure “Select” is checked next to “Mic Volume”.
You can find the volume control from the Start/Control Panels/Sounds and Audio Devices. You can also access it by right clicking on the speaker at the bottom right hand side of the screen and choosing Adjust Audio Properties.
The first screen looks like this. Click on the Audio tab.
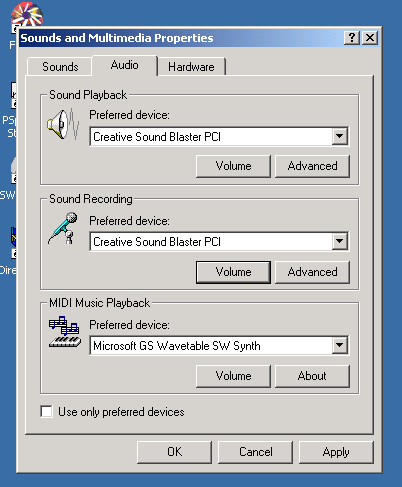
Click on the “Volume” button in the “Sound Recording” section and you will see a screen that looks like this.
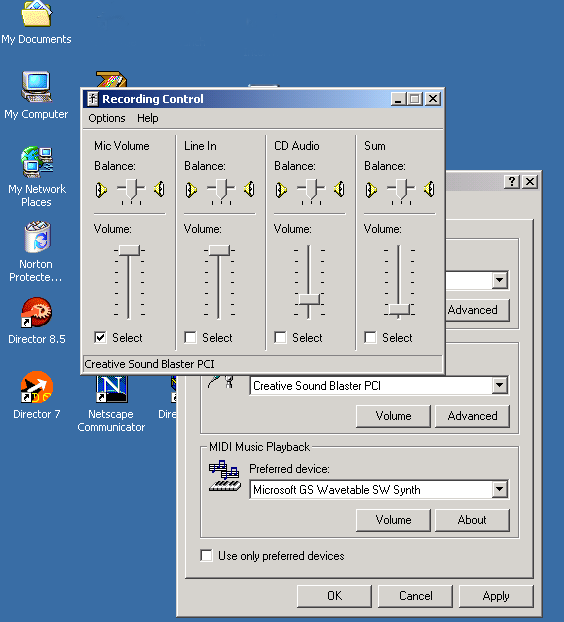
You may have more equalizers than are shown here.
To test if you can record on Windows, go to Start > Programs > Accessories > Multimedia > Sound Recording. If you can record and play back sounds from there then our software will work as well. Note that the Sound Recorder uses the same button system that we do, as described below.
No Sound
If you have no sound, make sure that speakers are plugged in to the correct port on the computer, that they are turned on, and that the volume is turned up. Check for loose connections.
Microphone Feedback
Open the sound control panel and check to be sure that the play through option (or listen) is not selected. Some toys that connect to the computer, e.g. Barney, turn the play through option on. This will result in a high pitched feedback sound that is louder the closer the microphone is to the speakers. You may have to restart the machine for changes to take effect.
Sound Quality
Sound quality depends very much on the microphone used. Using an external mic that is not too close to the computer will produce CD quality sound. Using an internal mic or one that is very close to the computer will produce good sound but will also pick up the background noise of the computer and trackpad clicks.
Articulation I and Client Manager
Articulation I is the only software title that we sell that comes on two discs and for historical reasons you need to pick the disc you want to use, even if it is installed on your hard drive. You must run the setup program on each disc in order for all of the words to be installed. The first disc will install icons for Disc 1 and Disc 2, but it does not prompt you for the additional disc.
If you want to run Artic from Client Managar, you will see this screen
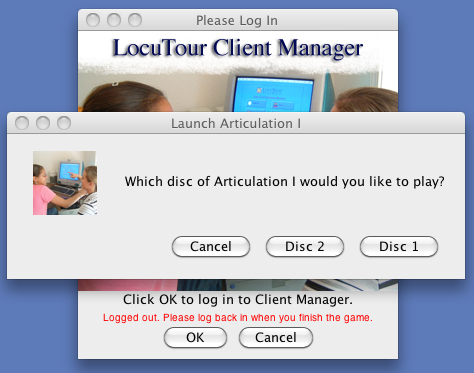
Select the disc you want to use from the dialog box.
Older versions of LocuTour Software
If you purchased your software after 2001, then your software is probably compatible with Windows 2000 or newer. A complete list of compatible version numbers is here..
Checking for Compatible CDs
- If your CD has a color label, it is compatible.
- If the installer asks you to go to our web site and register, then it is compatible.
- If you find a Win2000 folder on your CD with a setup.exe file inside of it, then it is compatible. Re-install the software using this setup file.
- If your CD does not have a colored label (black text only) and you don't see a Win2000 folder on your CD, then it's not compatible.
- If the installer asks you whether you want to install on Windows 3.1 or Windows 95 then your software is definitely not compatible.
Updates for many titles can be downloaded here. For titles that are not listed, or if you want to receive a new CD, instructions for updating by mail are here.
Updating or Migrating Client Manager
The newest versions of Client Manager will save your client information in the new preferred app data location. This is a different location than Windows XP and 2000. If you only have a few clients, or these instructions seem a bit complicated to you, you can export your clients using the archive utility in Client Manager. Then import on the new machine.
If you have many clients, follow the steps below to transfer your old information. If you are upgrading on the same machine, be sure to follow these steps before installing an update to Client Manager.
IMPORTANT: If you don’t understand/have trouble with any step of this process, please call us, or your system administrator, or you WILL lose your data on existing clients.
First, you’re going to need to enable display of hidden files and folders (you may need an administrator to do this)
- Go to the Control Panel
- Choose Folder Options (you may need to search for it on newer versions of windows)
- Choose the View tab
- In the 'Hidden Files and folders' folder, choose the option 'Show hidden files and folders'
- Hit Apply and OK then close Control Panel.
Second, copy the data out of the old version of Client Manager:
- On pre-Windows 7 machines, go to (My Computer or Computer) -> Local Disk (C:) -> Program Files -> LocuTour Multimedia -> Client Manager
- On Windows 7 or greater machines. Go to Users ->Your user Name e.g llsc ->AppData ->Roaming ->LocuTour Multimedia ->Client Manager ->Data
- Drag the Data folder to your Desktop while holding down the Ctrl key. A copying progress window should appear briefly.
- Open the Data folder on your Desktop and make sure it contains several files including folders for your clients, then close it.
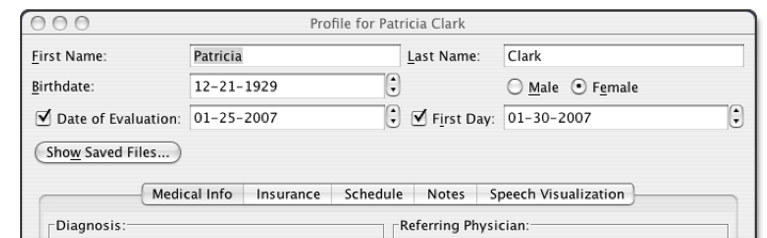
If you can’t find the data files, you can use Client Manager to help. Open a client record and click on the button for Show Saved Files
On my Windows 7 and 8 computer, with a login name of llsc the location that shows up in the top bar is: Users\llsc\AppData\Roaming\LocuTourMultimedia\Client Manager\Data
Third, install the new version of Client Manager, choosing the option to continue at each of the warning popups. Run the new Client Manager, log in, and then quit before creating any clients or running any games.
Fourth, copy the data folder you copied to your desktop into the new Client Manager data directory
- On pre-Windows 7 machines, go to (My Computer or Computer) -> Local Disk (C:) -> Documents and Settings (on Windows XP) or Users (Windows 7) -> your user name -> Application Data -> LocuTour Multimedia -> Client Manager
- On Windows 7 or greater machines. Go to Users ->Your user Name e.g llsc ->AppData ->Roaming ->LocuTour Multimedia ->Client Manager ->Data
- Drag the Data folder from your desktop into this folder while holding down the Ctrl key. It should ask you to Confirm Folder Replace, choose Yes to All and then a copying progress window should appear briefly.
Run Client Manager again and make sure your old clients are there.
You probably want to turn off the display of hidden files from step 1.
Runtime Error message when Playing Video
Some of the LocuTour CDs use Apple’s QuickTime to play videos. It appears that some of the Apple files can become corrupted and prevent playback. The error message is “Runtime Error! R6034 An application has made an attempt to load the C Runtime library incorrectly.”
The fix is to re-install Apple programs. We have not experienced this error but by re-installing the following programs, the error disappeared on customer’s machines: iTunes, QuickTime, Safari, and iCloud.
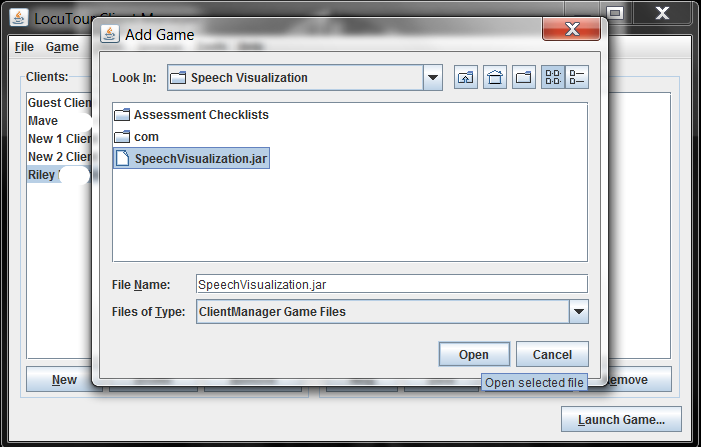
Adding Games to Client Manager
Sometimes Client Manager cannot find a game that is on your system, or if a game was installed by an administrator, it cannot find files that are normally available to it. In this example, Client Manager already knows about Speech Visualization but can’t see the sound files that it needs. By adding Speech Visualization again, it will find the sound files.
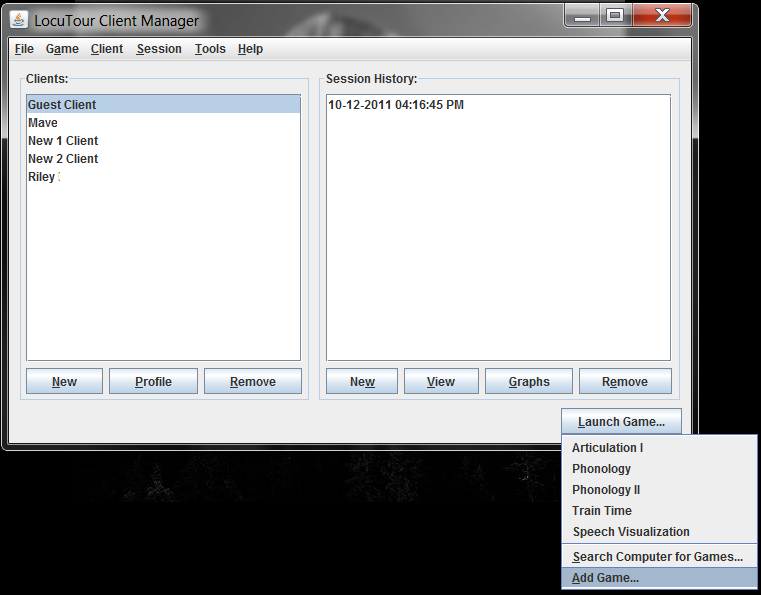
At the bottom of Client Manager, click on Launch Game and then Add Game
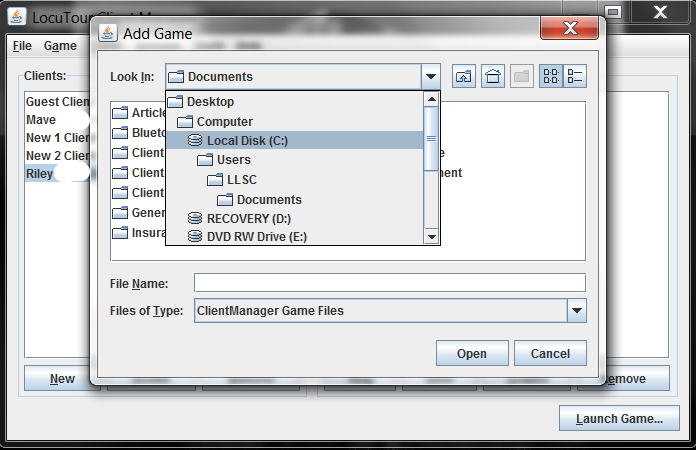
Pick Local Disk (C:)
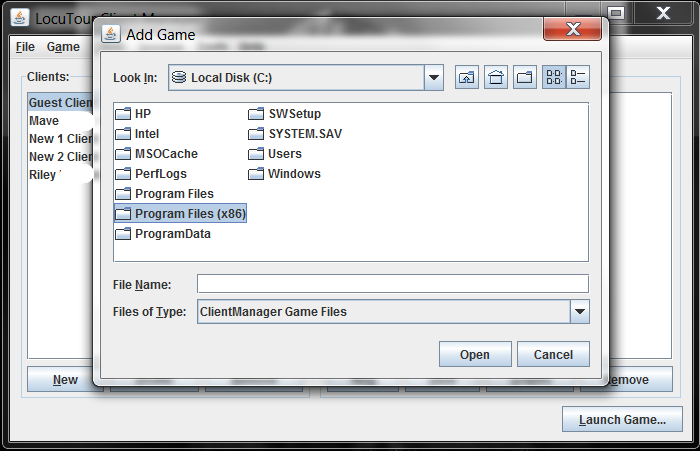
Then pick Program files (X86)
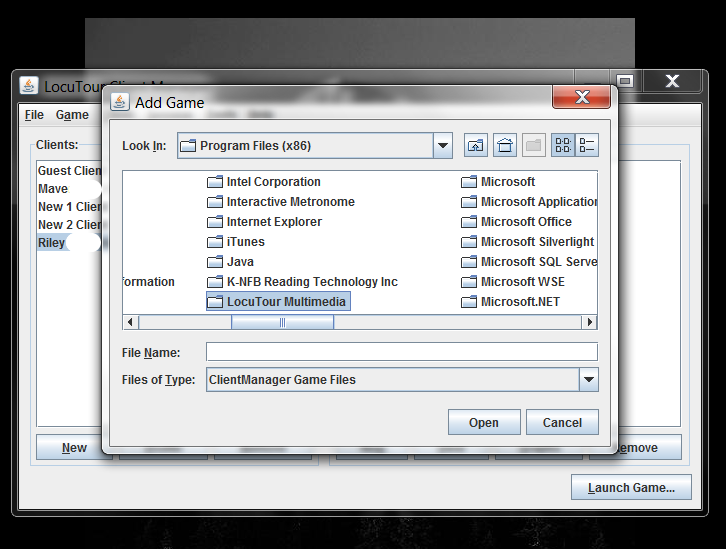
Then pick LocuTour Multimedia
Now pick the game you want to add, in this case Speech Visualization
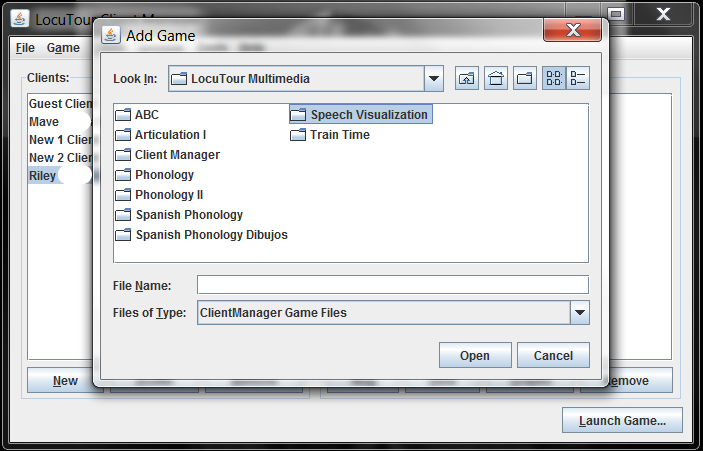
Then pick the game name with .jar
Miscellaneous Hints
Error Message: Application Error "This application cannot run".
A program has placed old versions of Macromedia Director run-time files in your system folder. To fix: Open C:\Windows and C:\Windows\System32 and delete the files called dirapi.dll and iml32.dll. Try running the LocuTour program again. As with all things Windows, a restart may be required.
Error Message: "Settings Not Found"
Many of our programs save a settings file in your temp folder. This error is common after the Demo CD has been run. To fix the problem, open up "C:\windows\temp". In that folder, erase any file that ends in '.cst'. If the program is Articulation II, the file is called "ArticII.cst" etc.
Intro Music Doesn’t Stop Playing
If the intro continues to play after clicking on the screen, then you most likely opened the program twice. When you double-click the shortcut to start the program, you might have clicked it too many times, causing multiple copies of the program to open. To fix this problem, close the program and double check your start bar to make sure there are no other copies of the program open. Then re-open the program, making sure that you only open it once.